Manipulating the Screen
The main way to manipulate the screen is by subscribing to a ScreenEvent
and using the event methods to add widgets, renderables, and context menus at certain phases.
We can then combine this with preferences to make them user-configurable.
The Screen Context
From screen events you can access the ScreenContext, which provides the current screen state and various utilities for interacting with it.
Accessing Screen State
You can retrieve the underlying Minecraft components and the current state of the pack lists:
screen(): Returns the currently displayed screen instance.originalScreen(): Returns the original pack selection screen, or creates a new one if replaced.packRepository(): Returns the pack repository the screen is managing.packType(): Returns thePackTypebeing managed (e.g.,CLIENT_RESOURCESorSERVER_DATA).isClientResources()/isServerData(): Helper methods to quickly check the pack type.getAvailablePacks()/getSelectedPacks(): Returns the lists of packs as they currently appear in the screen.
Screen Lifecycle & Data
Control how the screen behaves and when changes are applied:
rebuild(): Triggers a rebuild of the current screen to reposition or toggle widgets.reload(): Forces thePackRepositoryto reload and updates the GUI state.commit(): Applies the changes in the selected list; this may trigger a resource/data reload and will close the screen if managing data packs.devMode(): Returns true if the screen is currently in developer mode.
UI Modification
The screen context exposes some familiar Screen methods:
addWidget(T widget)-TextendsGuiEventListener & NarratableEntryaddRenderableOnly(T renderable)-TextendsRenderableaddRenderableWidget(T widget)-TextendsGuiEventListener & NarratableEntry & RenderableremoveWidget(GuiEventListener widget)
Example Usage:
java
Identifier id = Identifier.fromNamespaceAndPath("modid", "my_listener");
api.eventBus(InitializeEvent.Post.class, id, event -> {
if (event.screenContext().isServerData()) return;
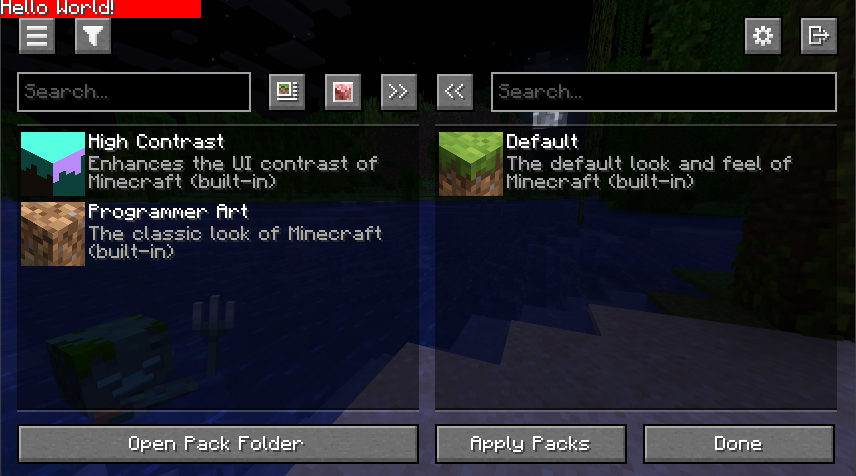
event.screenContext().addRenderableOnly((guiGraphics, mouseX, mouseY, partialTick) -> {
guiGraphics.fill(0, 0, 100, 9, 0xFFFF0000);
guiGraphics.drawString(Minecraft.getInstance().font, "Hello World!", 0, 0, 0xFFFFFFFF);
});
});
Advanced Utilities
The ScreenContext also provides utilities for creating more interactive widgets.
Preference-Wrapped Widgets
The wrapWidget method ties a widget's visibility directly to a preference, and allows it to be toggled in developer mode via context menu.
Example Usage:
java
Identifier id = Identifier.fromNamespaceAndPath("modid", "my_button");
Preference<Boolean> enableButton = api.preferences().register(id, true);

api.eventBus().register(InitializeLayoutEvent.class, id, event -> {
    Component label = Component.literal("My Button");
    Button myButton = Button.builder(label, btn -> LOGGER.info("Hello World!")).build();

    AbstractWidget wrapped = event.screenContext().wrapWidget(enableButton, label, myButton);
    if (wrapped != null) { // wrapWidget returns null if it's not visible
        event.addWidget(InitializeLayoutEvent.Pos.AFTER_TITLE, wrapped);
    }
});
Context Menus
Add a local context menu to a widget using wrapWithContextMenu
NOTE
For this to function, the widget must be a direct child of a non-injected GuiEventListener or another wrapped widget.
Example Usage:
java
Identifier id = Identifier.fromNamespaceAndPath("modid", "my_button");
api.eventBus().register(InitializeLayoutEvent.class, id, event -> {
ScreenContext ctx = event.screenContext();
Component label = Component.literal("My Button");
Button myButton = Button.builder(label, btn -> LOGGER.info("Hello World!")).build();
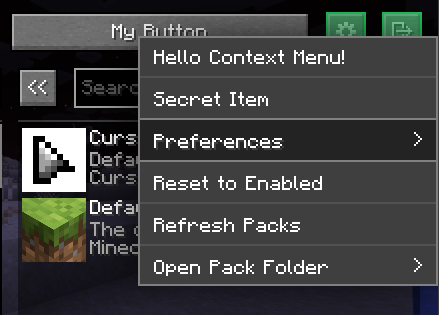
AbstractWidget wrapped = ctx.wrapWithContextMenu(myButton, (btn, sink) -> {
sink.addItem(item -> item
.label(Component.literal("Hello Context Menu!"))
.action(() -> LOGGER.info("Hello from Context Menu!")));
if (ctx.devMode()) {
sink.addItem(item -> item
.label(Component.literal("Secret Item"))
.action(() -> LOGGER.info("The password is 123")));
}
});
event.addWidget(InitializeLayoutEvent.Pos.AFTER_TITLE, wrapped);
});
Use Cases
The following are common use cases for manipulating the screen and how to implement them.
Injecting a Toggleable Header Button
The most common use case is injecting simple buttons that redirects to your custom screen.
Injecting to the header is the usual choice as it has the most available space. Placing too many buttons at the header will still get it cluttered however, so we should also make the button toggleable with a Preference.
The following example demonstrates how to add a button to the screen header that only appears if a specific preference is enabled.
java
// Define identifiers for your preference and event listener
Identifier id = Identifier.fromNamespaceAndPath("modid", "my_button");

// Register a persistent boolean preference that will determine the button's visibility
Preference<Boolean> buttonEnabled = api.preferences().register(id, true);

// Listen for layout initialization to inject the widget.
api.eventBus().register(InitializeLayoutEvent.class, id, event -> {
    ScreenContext ctx = event.screenContext();

    // Early return if we don't want the button to appear in the data pack selection screen
    if (ctx.isServerData()) return;

    Button button = Button.builder(
        Component.translatable("modid.gui.my_custom_screen"),
        btn -> Minecraft.getInstance().setScreen(new MyCustomScreen(ctx.screen()))
    ).build();

    // wrapWidget automatically handles the preference check,
    // dev-mode overlay, and the local context menu.
    AbstractWidget wrapped = ctx.wrapWidget(
        buttonEnabled,
        Component.translatable("modid.gui.my_button"),
        button
    );

    // wrapWidget returns null if the button should not be visible
    if (wrapped != null) {
        // Add the widget to a specific layout position.
        // Spacing and alignment is handled automatically.
        event.addWidget(InitializeLayoutEvent.Pos.AFTER_TITLE, wrapped);
    }
});

// Listen for the preferences sub menu to add our preference
// We can reuse the same listener id since this is for a different event
api.eventBus().register(ContextMenuEvent.Preferences.class, id, event ->
    // Add our preference in the preferences sub menu
    // The preference will also be reset when the user clicks on 'Reset Preferences'
    event.addToggle(buttonEnabled, Component.translatable("modid.gui.my_button"))
);
Adding Actions to Pack Entries
Another common use case is to provide pack-specific actions that only appear for certain packs.
This example demonstrates how to add a toggleable "Edit Pack" action as both a visible button on the pack entry and an option in its context menu.
java
public class PackedPacksIntegration implements PackedPacksInitializer {
    private static Component EDIT_PACK_TEXT = Component.translatable("modid.gui.edit_pack");

    @Override
    public void onInitialize(PackedPacksApi api) {
        // Define identifiers for preferences and event listeners
        Identifier id = Identifier.fromNamspaceAndPath("modid", "edit_pack");
        Identifier buttonId = id.withPath("edit_pack_button");
        Identifier menuId = id.withPath("edit_pack_menu");

        // Register preferences to determine their visibility
        Preference<Boolean> buttonEnabled = api.preferences().register(buttonId, true);
        Preference<Boolean> menuEnabled = api.preferences().register(menuId, true);

        // Listen for pack entry initialization to inject a widget.
        api.eventBus().register(InitializePackEntryEvent.class, buttonId, event -> {
            // Filter for specific packs.
            if (canEditPack(event)) {
                // wrapWidget automatically handles the preference check,
                // dev-mode overlay, and the local context menu.
                AbstractWidget wrapped = event.screenContext().wrapWidget(
                    buttonEnabled,
                    Component.translatable("modid.gui.edit_pack_button"),
                    Button.builder(EDIT_PACK_TEXT, btn -> editPack(event)).size(16, 16).build()
                );

                // wrapWidget returns null if the button should not be visible
                if (wrapped != null) {
                    // Position the button at the bottom-right of the entry
                    // Widgets will automatically stack from right to left
                    event.addBottomRight(wrapped);
                }
            }
        });

        // Listen for pack entry context menu events
        // to add an entry to a specific pack entry's context menu
        api.eventBus().register(ContextMenuEvent.PackEntry.class, menuId, event -> {
            // Filter for specific packs and check the preference value manually
            if (canEditPack(event) && menuEnabled.get()) {
                event.addItem(item -> item
                    .label(EDIT_PACK_TEXT)
                    .action(() -> editPack(event))
                    .separators());
            }
        });

        // Listen for the preferences sub menu to add our preferences
        api.eventBus().register(ContextMenuEvent.Preferences.class, id, event -> {
            // Add our preferences in the preferences sub menu
            // The preferences will also be reset when the user clicks on 'Reset Preferences'
            event.addToggle(buttonEnabled, Component.translatable("modid.gui.edit_pack_button"));
            event.addToggle(menuEnabled, Component.translatable("modid.gui.edit_pack_menu"));
        });
    }

    private static <T extends ScreenEvent & PackEntryEvent> boolean canEditPack(T event) {
        return event.screenContext().isClientResources() &&
               event.packContext().pack().getId().startsWith("file/") &&
               // this checks if the pack is currently selected in the repository among other things
               // but if we aren't modifying the pack file itself, we can skip this check
               event.packContext().fileModifiable();
    }

    private static <T extends ScreenEvent & PackEntryEvent> void editPack(T event) {
        if (canEditPack(event)) {
            Minecraft.getInstance().setScreen(new PackEditorScreen(
                event.screenContext().screen(),
                event.packContext().pack()
            ));
        }
    }
}